

When doing digital illustrations for a project I am continually asked about how much of the drawing was actually modeled versus the amount that was painted in Photoshop. So I put together a bit of a tutorial from a recent sketch for a park project I helped design this past year.
Generally, as you will see from the tutorial, I like to model only what is necessary. Kurt Fromm describes it as creating a “stage set”. I place enough information in the model to give me visual cues from which to paint from as I am much more comfortable painting and drawing than clicking a mouse for hours at a time. Most often I will create a simple SketchUp or Rhino model, export into Cinema 4D to render, and then into Photoshop for painting.
In the particular case of this drawing, time was limited so I simply painted over some quickly exported SketchUp views. I feel this tutorial will help show that you simply do not need expensive complicated software to create quick loose illustrations that will explain an idea in a concise professional manner. Tools needed: I use a 21″ Cintiq for painting…but a simple Intuos tablet would also work, SketchUp, Photoshop…and, well a computer, of course.
 Yes… this was my starting point and as you can see the model is a very simple stepped terrain with just a few elements added for scale. I placed this on an 11 x 17 at 300 dpi in Photoshop and began to paint.
 Initially, I just created a layer where I painted and smoothed the terrain keeping in mind where the sunlight was coming from.
 Then, using photographs I had taken from one of Iowa’s many prairies, I created a texture along the ground plane. I think it is important to develop a library of reference images, that includes textures and entourage elements, so you have them ready at your disposal for drawings and graphics.
 I filled in the open areas of the landscape using the Dune Grass brush. I am using the color palette I had already established from the basic textures I applied in the model.
 Here I have added foreground plants and rocks again from a photographic source. I always make sure to simplify any photographic sources I incorporate by applying filters. Otherwise you end up with some very odd juxtapositions…photoreal vs non-photoreal.
 Painting in the trees.
 Adding details.
 Entourage.
 Making the drawing cohesive through texture and a layer mask. (Part 1)
 Making the drawing cohesive through texture and a layer mask. (Part 2)
 Vignetting.

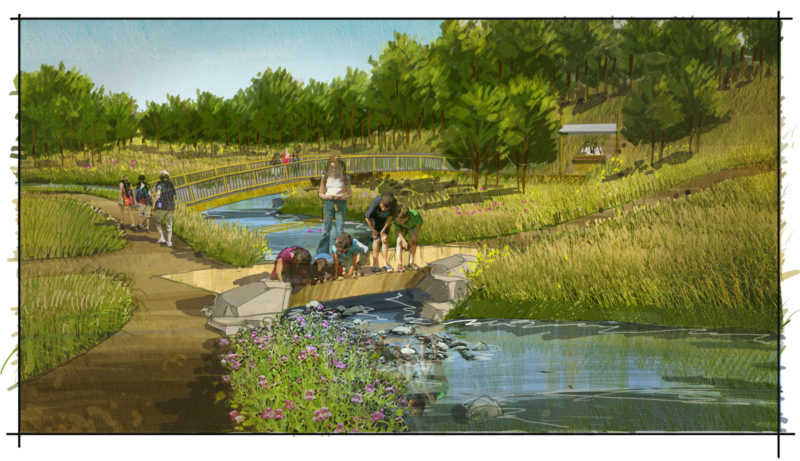
Final image after vignetting.
Hopefully you found this tutorial helpful and can start to turn your simple exported SketchUp views into great drawings that tell a story and help describe your ideas. If this was helpful I will continue to post more. Let me know of any thoughts or questions and thanks for taking a look. Keep drawing!!
Published in Blog


Laura Powell
Hi Travis, That’s an excellent tutorial. Even though I was used to creating renderings in Archicad, I find myself relying on photoshop more and more for landscape renderings. It just seems easier and more fun. I don’t have a tablet although I plan on buying a Wacom soon. Do you watch the Creative live network on the internet? They had a Photoshop Live week and I learned a lot from the experts. One thing they taught me is about brushes. You can get free brushes from sites like Brusheezy and http://www.deviantart.com. Deviant also has a lot of really great .png images (trees and plants) that are already cut out with no backgrounds. Then you can make a brush in photoshop and never have to look for your stock again. The brushes can be minipulated and resized so they fit whatever you are using them for. Thanks for the tips about masking & vignetting to make the drawing look more realistic. I will try it. Laura Powell
nca
Great tutorial. Thanks for sharing!
Andrew Spiering
Agreed! This is awesome, Travis. Thanks for sharing…
Bob Luther
excellent tutorial and well developed rendering!
Kevin Ho
Very Impressive! Thanks for sharing!
Travis Rice
Thanks for the comments! I will continue to put together some more tutorials on graphics.
landplanner
Travis-
Beyond excellent presentation of superior digital rendering techniques. A true inspiration.
I greatly appreciate how you broke the process down into a sensible and clear sequence of annotated screenshots. The explanation notes were very helpful.
Probably due to my own neophyte status when it comes to digital rendering, I found the final preparation, entourage through layer masking to a bit more difficult to comprehend.
Again, thank you for a great posting here and I have front row seat in your fan club. I look forward to more contributions like this one from a clear powerhouse talent.
John C Duthie
Awesome! Thanks for this …
Bob Cleaver
Travis- Incredible, the image is wonderful
The technique is very well delineated
Thank you very much
Any new images or tips are appreciated
Goustan BODIN
Great tutorial, ty for sharing
Magdalena Ancińska
great tutorial, really !
Chad Yagodzinski
Hey Travis,
One of the best tutorials I have seen yet, and so very simply put. To be honest I wouldn’t change a thing with the way you prepared this tutorial. Would love to see more like this. I really appreciate you passing on the knowledge! -Chad
Travis Rice
By the way I was referencing a comment from Kirk Fromm not Kurt Fromm…my brain occasionally goes on vacation. Kirk is an incredibly talented illustrator and designer whose work is definitely worth checking out. Sorry Kirk. Thanks again for all the positive comments.
Travis Rice
Fernando…Thank you very much for the kind words!
Ryan Hyllested
Thanks for the tips!